Monday, March 10, 2014

More Flux.   So a few posts back I posted a single frame of flux nebulosity near M81/M82.   It was a single 15 minute exposure.  That evening I had managed to take 17 exposures at 15 minutes.   All the exposures showed excessive trailing due to mysterious mount issues.  For kicks, I decided to stack 16 exposures to see what I would get.   Here it is:  Camera:  135mm Zeiss at F/3.2.   Mount:  Orion Sirius.   Shots at 800 ISO.   Stacked in Deep Sky Stacker with lights and bias only.  No flats, no darks.   Heavily pushed in levels in Photoshop.   The colors were really out of whack and I couldn't recover anything that resembled "normal".   Interesting result.


You can see M82/M81 in the upper right of the shot.

I believe the shape in the lower half of the screen is referred to as the "angel".   I think if I stuck with the astro-physics mount and dedicated 3 nights (maybe 12-15 hours total) to this area, I could come up with enough data for a passable image.   As it stands, I have to push it so much that I end up with too much noise for my taste.


This is the processed Seagull Nebula with data taken on 2/21/14.   Scope:  Zeiss 135mm lens at f/3.2.  Mount:  Orion Sirius.   On dual saddle guided with the Sky-Watcher 66mm f/6.5 scope.   Best 33 out of 50 exposures at 3 minutes, 1600 ISO.   Darks and Bias frames used.   But NO flats.  Shot through the Canon T3i.    Stacked in Deep Sky Stacker, processed in CS5.


The "head" of the Seagull is referred to as GUM-1.   The open cluster in the upper left is M50.   The smaller cluster embedded in the left "shoulder" is NGC 2335.   The cluster in the left part of the "abdomen" is NGC 2343.   And the cluster to the far right is NGC 2345.  The overall body of the Seagull is designated as IC 2177.

This was a bear to process in Deep Sky Stacker.   It kept producing a TIF file that was severely clipped.      I spent several hours reprocessing with different parameters.   Normally, I stick with the default settings using "Median Kappa-Sigma" for my stacking of lights, darks, and bias.   In the end, these worked, but for the sake of memory, I'm listing other settings:   Register settings - actions - Select best 90%.   Star Detection at 45%.   Stacking:  Mosaic.   ENABLED 2x Drizzle.   Alignment:  Auto.   Cosmetic:  Nothing selected.  Before exporting out of DSS, I tweaked the TIF file in the native editor as much as I could to bring out the red nebulosity.

In Photoshop, the most important manipulation of the image was under the "Select" menu:  Both "Color Range" and "Refine Mask" were pivotal in selecting the faintest red areas of the nebulosity so that I could bring it out in post-processing.     Processing is such a pain.

Comparing this to the earlier single frame I posted a couple weeks ago…it doesn't seem like it's much of an improvement.    In fact, I like the colors better in the single frame I processed.    My only solace is that there's probably less noise in the image above, but you'd have to have a large print to notice any difference.

Sunday, March 9, 2014

Charles wanted to know what things looked like before processing so here's a single frame brought straight into Photoshop with no processing, then exported as a level "8" jpeg.


And then here's that frame processed and cropped a bit to replicate the image from my last post:


What's obvious is the noise and loss of some faint detail compared to the previous post's image.  Keep in my that stacking is an AVERAGING process, not additive.    What you're doing is increasing the signal-to-noise ratio by stacking successive frames.   What that means in practice is that you can bring out a lot more detail in post processing.  Informally speaking, there is in a sense an "additive" process going on.   I haven't done it myself, but if I had stacked 100 images, I'd bring out more whispy, faint details in the disks of the galaxy -- which to me is the hallmark of an exceptional image.    There's definitely more detail to bring out in my previous post's image, but that will take time.   For example,  in M66 (the right most galaxy) there is a faint whispy extension of the spiral arm on the left most part of the galaxy.   You can barely see it in the previous post.  But it's harder to see in the above image because it's more buried in the noise.  
 
The other obvious technique is to take longer subexposures (like 10-15 minutes).    Which is always easier in theory to do than in practice.   I've found that the hit-to-miss ratio is much lower in longer exposures.  At five minute exposures, I can expect to keep 75% of the results.  With 10-15 minute exosures, I can expect a lot less.   Of course I'm assuming we're sticking with the Sirius mount.  I think that number would jump to 97 percent keepers at 5 min and 90 percent keepers at 10-15 minutes with the Astro-physics mount.
 
If you look closely at NGC 3628 (aka "the Hamburger") in my previous post, you can see a faint nebulous extension perpendicular to the disk of the galaxy pointing to the 2 o'clock position.  And to the left of the disk of 3628 (on the same side) you can see a scattering of tiny galaxies.   Those features are largely lost in the noise of the single frame.   For a reference, check out this image of 3628 from one of the masters of astrophotography, Russell Croman:
 
 
It's sorta upside down compared to my image.
 

Here's my first effort using Lights, Darks, Flats, and Bias frames.   Taken on 2/24/2014.   Scope:  Tak 102 w/.8x Televue Reducer/Flattener.   Mount:  Orion Sirius.   Camera:  Modded Canon T3i.   Exposures: Best 37 out of 48 five minute exposures at 1600 ISO.   Stacked in Deep Sky Stacker.   Processed Photoshop CS5.   The TIF file produced by DSS was very red and I had to use Camera Raw in Photoshop via the Bridge.


There was something really goofy about the dark files.   There's an odd gradient in the left side of the image.   I was also surprised at the overall noise in the image.   There's also a fair bit of clipping around the edges of the galaxies.    I'll address the excess noise and clipping when I have some time.  

Oh yeah, the subject?   The Leo Trio.   Made up of M65 (upper center), M66 (right), and NGC 3628 (lower left).   


Tuesday, March 4, 2014

After 7 sessions with the smaller rig, I decided to setup the "big rig" to become familiar with the bigger mount and 45 lb telescope.   It was all so different that I felt like it was the first time.


As you can see, I was stuck under a hazy sky that got worse and worse.   I was using the OAG with the guide camera.   The haze was so bad that I had to resort to 8 second exposures with the auto guider.   I ended up having to use a "dark frame" to subtract noise.   I was a bit skeptical, but I worked my way up from 60 seconds to 4 min to 6 min, then finally, to 10 min on M81.


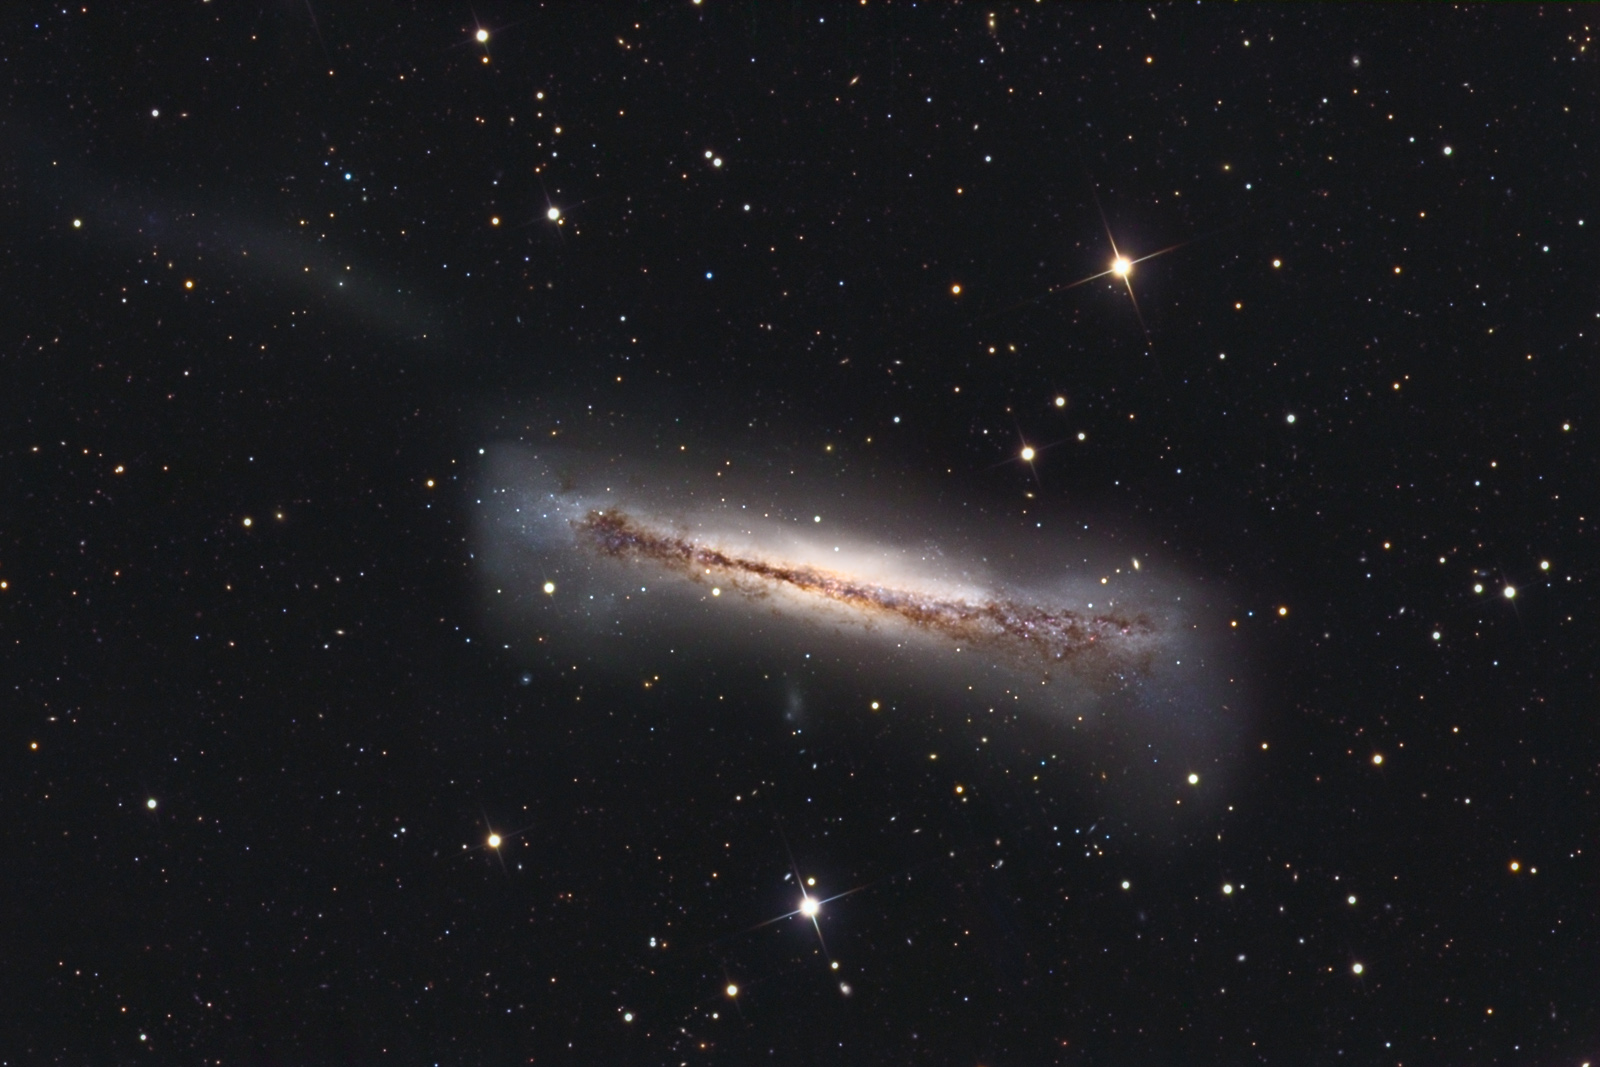
The conditions were pretty bad, but it wasn't too bad for shooting through a very hazy sky.   Single frame, 1600 ISO, 10 min, curves, levels, hue, vibrance in Photoshop.

[Cont'd later]

Setup time was considerably longer.  I started setting up around 8 and I wasn't taking my first test images until 11:30.   The setup was much farther away from the house.   My logic here was that I could use the neighbor's outdoor storage building to block the obnoxious light from another neighbor who always has to have a bright backyard light on.   I discovered that while the site location worked in this regard, I was doused with light from yet another neighbor across the street and down a bit.    At some point, this neighbor turned off their front porch light.   But it was still an annoyance.  

Another reason for the longer setup was the Off-Axis Guider (OAG).   It was really hard to find stars and just as hard to get good focus.  I had to keep increasing the exposure length in PHD2 to get any kind of signal.   This problem was exacerbated by the deteriorating conditions.   The upside was that I was able to get roundish stars to guide on.   I also used a blue marker to note the focus location on the guide camera.

It took a long time to navigate the Astro-Physics hand controller.  It's very different than the Synta/Orion controller.   And I kept thinking I had to restart the mount to get to some menus when in fact, I just didn't know how to navigate the menus.  I ran around like an idiot trying to find the manual, but then I realized I could download it and pull it up on the laptop.  Yay for wireless.

A potential problem with the big setup is cable length.  To connect the camera and autoguider with the laptop I'm using 6 ft USB cables.  It's quite apparent that some slews will pull the cable too taut.   I'm going to have to invest in 10 ft cables.   Also, the AC power that powers the camera is a little short.   I think I'm going to have to run the extension cord up the pier and keep it secured maybe with bungee cords.  

Overall, I was suprised by the effectiveness of the guiding.   I expected there to be problems with 6 and 10 minute exposure.  There actually was a problem with the 4 min. exposure as the stars looked like two connected blobs.  I suspect that either I hit the mount or PHD2 lost the guide star for a while.   For polar alignment, I just used the polar scope.   Because it had taken SO LONG to setup, I decided not to use the "DSLR method" of polar alignment.   With the finer controls on this mount, I should be able to dial in some excellent polar alignment next time.

Oh, yeah, the shot of M81 is full frame on the Canon T3i.  The FOV (field of view) is obviously excellent for M81.   But in fact, there are not going to be many galaxies that large.   I did another shot (which I'm not posting) of M51 in the thickening haze, and though it didn't turn out well, it made me think that I really should be shooting around 2000mm FL.    The 8 inch f/6 comes in at 1200mm.