I've figured some things out but I'm still struggling with bringing out subtle detail.....
On the left is an image that I processed back in August. And on the right is the same data processed on 11/9/20. I was able to preserve much more subtle detail with techniques that I've learned in the past few weeks. The images reflect only 60 seconds of video footage so it's not great to begin with.
What have I learned?
I've been working on Saturn and Jupiter RGB images in an attempt to settle on a workflow for planetary images. I've added Winjupos to the workflow and though it works well to eliminate noise I can't really push the data much with additional sharpening. I can do some stuff in Camera Raw Filter like "Texture", "Clarity", and "Dehaze". But those enhancements come at the cost of resolution and noise. I was also sharpening in Camera Raw and I noticed that it would sharpen unevenly across the planet surface. Specifically, it sharpens the middle 75% more dramatically than the outer 25%. The result is a little weird as it made the center of the planet look like it was better focused than the outer parts.
All this made me wonder if I was doing destructive enhancements in Registax.
I wondered if it was a mistake to push the sliders in Registax very much before Photoshop. I mean, my workflow was that I stacked (maybe with 25-50%) in Autostakkert, then brought it in to Registax, did the autostretch, then pushed the sliders far enough to see decent detail on the planet surface. I would then bring the Registax enhanced R, G, and B channels into PS and merge them into an RGB image. From there I would do an alignment of color channels, then jump into Camera Raw to increase texture, clarity, etc.
I began to notice that the planetary image would have a pretty bright, offset area on the surface. Even with the Highlights and Whites sliders pulled down in Camera Raw it was still a challenge to not blow out a section of the image.
This is when I had a harebrained idea to use HDR Toning (Image --> Adjustments --> HDR Toning) to flatten the brightness of the surface. Then I would do an Autocontrast to bring everything back up to an appropriate brightness. I processed two whole RGB data sets this way. And the results looked "cartoony" or a little bit like I had painted a watercolor version of Jupiter.
It never occurred to me to pixel peep the image before and after HDR Toning. Well, I finally did and it was definitely a destructive process. DON'T DO THIS AT HOME, KIDS. It's like the resolution dropped by 30%.
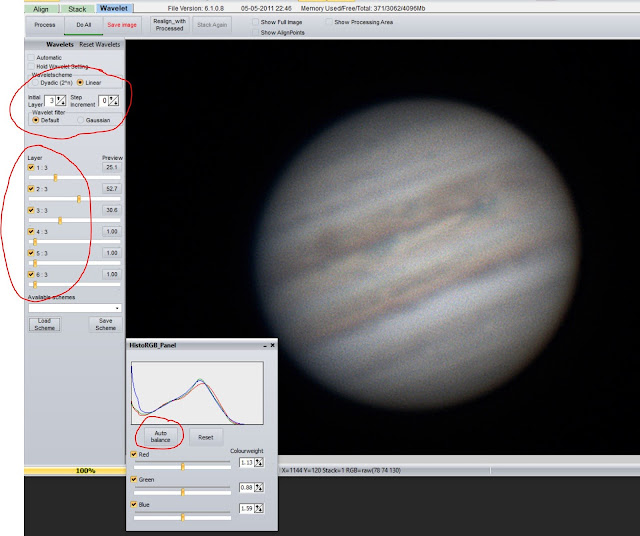
I thought maybe I need to go back to the data when it's in Registax. Registax wavelets can be a bit confusing. A lot of people seem to like "Dyadic" mode. In my experience, Dyadic tends to bring out a lot of artifacts. After A LOT of finagling between Registax and PS, I was able to figure out that LESS wavelets in Registax means more processing wiggle room in PS.
The first thing I changed was the initial autostretch that Registax asks about...
I'm not a 100% sure about this, but I *think* my limited stretching in PS was partly due to the fact that I let Registax stretch the image.
Furthermore, I found that "Linear" mode is less likely to bring out artifacts whilst moving the sliders. Specifically, in "Linear" mode, the best setting to prevent artifacts was to set "Initial Layer" to "3". A setting of 2, 4, and 5 can work as well.
As far as the layers, I found that it depended A LOT on the quality of the data. The higher the quality, the higher level layers, ie "3" or "4", can be beneficial. If the seeing conditions were not great, you generally want to manipulate lower layers 1-3. The picture above is not the best (ha) to illustrate this point. In fact, that Layer 2 slider is probably 50% too aggressive. But the reason I wanted to include this shot was to show that Registax does a very good job (about 80% of the time) of aligning RGB. So after combining the RGB channels in PS, I come back to do a quick RGB alignment, then continue back in PS.
Smart sharpen first! Use Camera Raw Filter later! I've tried this change on a few test images and it definitely helps. The first image of this blog post shows the difference. (And what's the nudging all about? The first thing you do actually is to ALIGN the red-green-blue channels. Unless the planet is like 75 degrees or higher, the OSC color image will have channel misalignment. The difference betwen aligned and un-aligned is subtle but I'll take as much improvement as possible.)
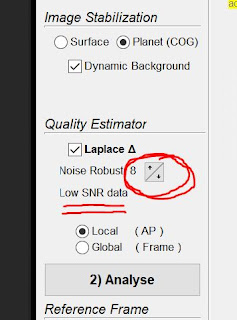
I'm going to end this long post by elaborating on some points I made in the preceding blog post. In Autostakkert, you can set a quality estimator value as you "Analyse" your video frames. The process basically orders the frames in terms of the best first and the worst frames last. So when you select 40% you are only stacking the best 40%. This is all well in theory.
A month ago when I was trying to do some preliminary processing, I sometimes found that there were good and bad images in the initial part of the stack. A couple times the first few images would be completely blurry. After spending an embarassing amount of time deleting those bad images (you can hit the space bar on a bad frame and it gets remove), I finally just tried methodically generating stacked images with differnt Quality Estimator values.
So I took the same video footage and ran it through Autostakkert with the same percentage of frames and the same alignment points. The only thing I changed was the Quality Estimator value. I was skeptical about significant improvement.
Below are the results after a mild stretch in Regtistax. All three used the same Registax stretch. But it's obvious (especially in the TIF file) that a setting of 8 is the best.
(click to enlarge)
Considering Flagstaff's lousy seeing conditions, I think a Quality Estimator setting of "8" should be the default.


No comments:
Post a Comment